Fitting Instructions - Prestige Parts Secondary Door Seals UT13535PB-X
Fitting Instructions - Prestige Parts® Secondary Door Seals UT13535PB-X
UT13535PB-X Secondary Door Seals may be fitted to any Rolls-Royce and Bentley 4-door models from 1980 up to 1996. They are designed to reduce wind noise, which is a problem for many motorcars where the primary door seal is fitted to the door rather than the body of the car. They do so by occupying the gap between the frame of the door and the body of the car (the “door gap”) where wind noise is generated. You will find that fitting a set of these seals will make a significant difference to noise inside the cabin.
The secondary door seal is located outboard of the main door to body seal. It is of a blade type section and fitted around the stainless steel window frame via an adhesive backing.
The effectiveness of the secondary seal is dependent on the gap between door frame and aperture being within a certain tolerance. This must therefore be checked and, if necessary, reset, particularly if it is suspected that the door has dropped or if a set of secondary seals are to be retrospectively fitted to an older car. Note that it may not be possible to achieve this gap tolerance on some cars.
To ensure a strong durable bond when fitting the secondary seal, it is important to observe the following points:
1) The bonding process must be carried out in an ambient temperature of at least 15°C (60°F). If the vehicle has been stored outside the workshop it will need sufficient time to acclimatize to the workshop temperature before any work is done.
2) Before fitting the seal, ensure that the door frame is completely dry and free from condensation since the presence of moisture on the frame will severely impair the bond strength of the secondary door seal adhesive. Use white spirit on a cloth to remove any grease or oil, being careful to use sparingly so that white spirit does not come into contact with paint or leather.
3) Ensure that the immediate environment is kept as dust free as possible during the fitting operation.
4) Due to the use of solvent cleaners, adequate ventilation must be provided in the working area.
NOTE: It is strongly advised that 3M Promoter Pen (3MPRIMER94-X) is used to increase the adhesive force of the Seal to the Frame. These Pens are available from Prestige Parts distributors.
5) When the frame has been finally cleaned and the promoter applied, do not apply any further wipes or cleaning material or touch the prepared surface. Apply the seal within 10 minutes of cleaning and prepping the frame.
6) The new seal should be stored at room temperature and kept in the protective bag until required. Prior to fitting, the seal should be warmed to 32-40°C (90-110°F).
7) Do not roll the new seal up tightly, squash under load or subject to deformation.
8) Do not touch the adhesive surface of the seal or allow it to come into contact with any other material before application.
Carry out the removal and fitting procedure as follows:
1) Measure the gap (shown as dimension 'A' in Fig. 1 below) between the top of the door frame and the door aperture along the full length of the frame
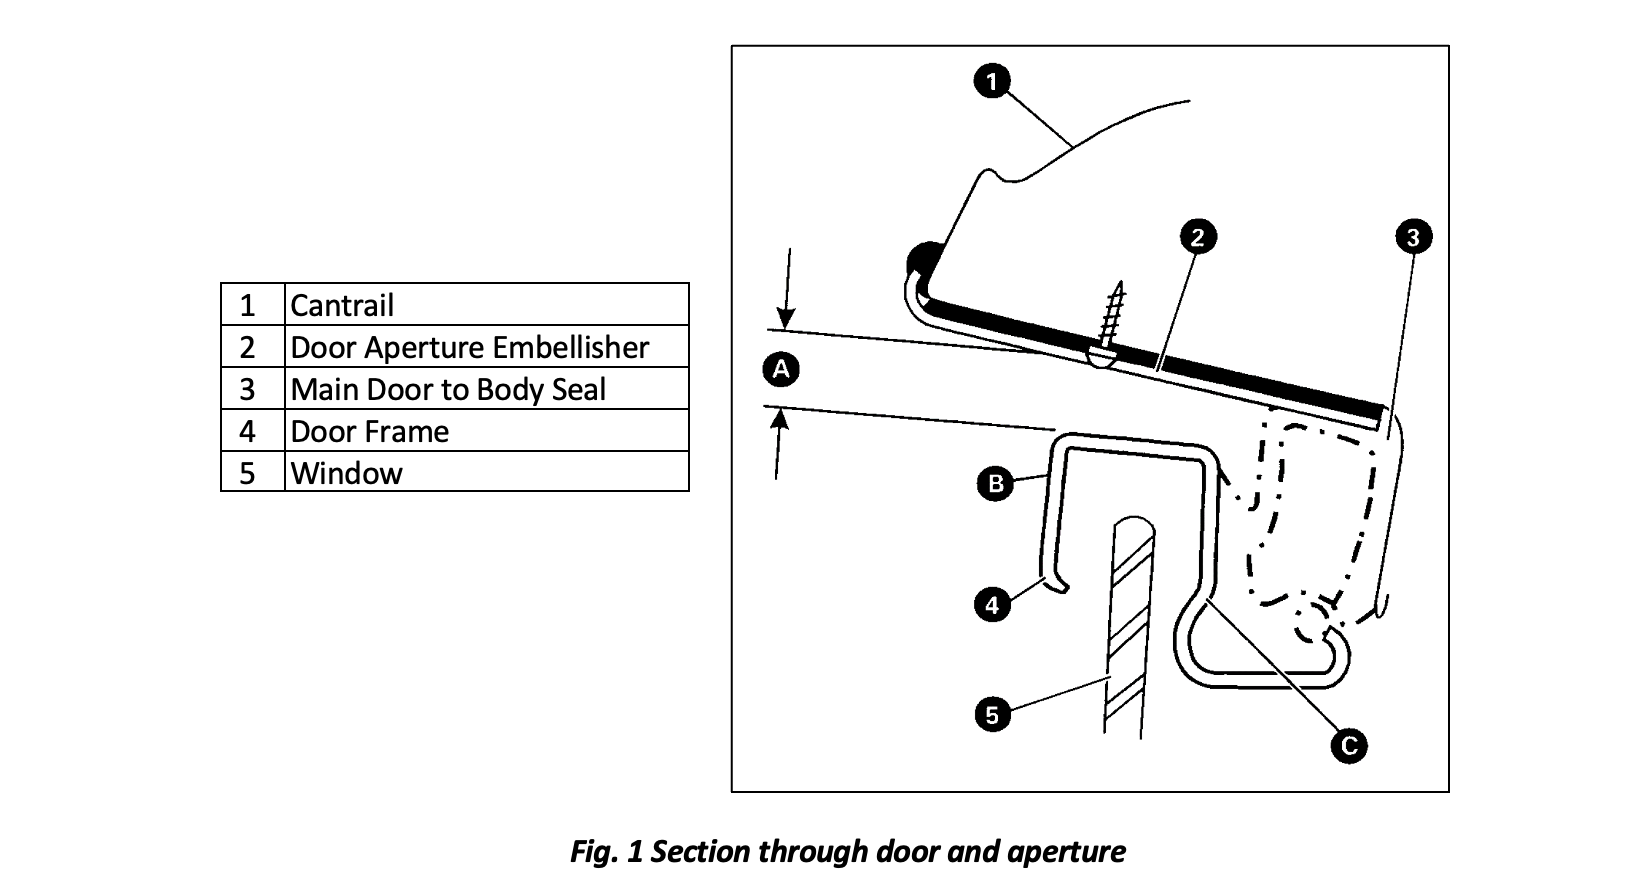
2) If this measured gap is between 5 mm and 10 mm for the full length of the door frame proceed to step 5 below. Pay attention to any convex screw heads, which should not come into contact with the seal.
3) If the frame gap is outside this tolerance, then the frame will need to be reset for the secondary seal to function.
4) Once the frames have been reset to achieve a gap of between 5 mm and 10 mm, proceed to step 5.
5) Remove the primary door seal from its retaining channel around the door frame.
6) If replacing an existing secondary seal, it is recommended that the following method is used:
(a) Carefully lift up one end of the seal using a blunt implement.
(b) Pull the seal lengthwise, i.e. stretching it, at an angle of not more than 15 degrees to the surface of the door frame.
(c) Using a suitable warm air blower (e.g. hair drier), direct the warm air on to the adhesive side of the seal while continuing to pull the seal off the frame. Do not use a high temperature blower (hot air gun).
(d) To remove any remaining adhesive/foam residue, use a Scotch-Brite (3M) adhesive removal disc fitted to a suitable handheld power tool.
7) Clean the frame outer surface between points 'B' and 'C' shown in Fig. 1. with a suitable cleaning solution and anti greaser, such as white spirit.
8) Apply 3M Primer Pen to the frame outer surface between points 'B' and 'C' shown in Fig. 1. Wait until dry.
NOTE: Once the frame has been cleaned, and the promotor applied, on no account touch the frame outer surface since any contamination will have an adverse effect on the bond strength of the new seal.
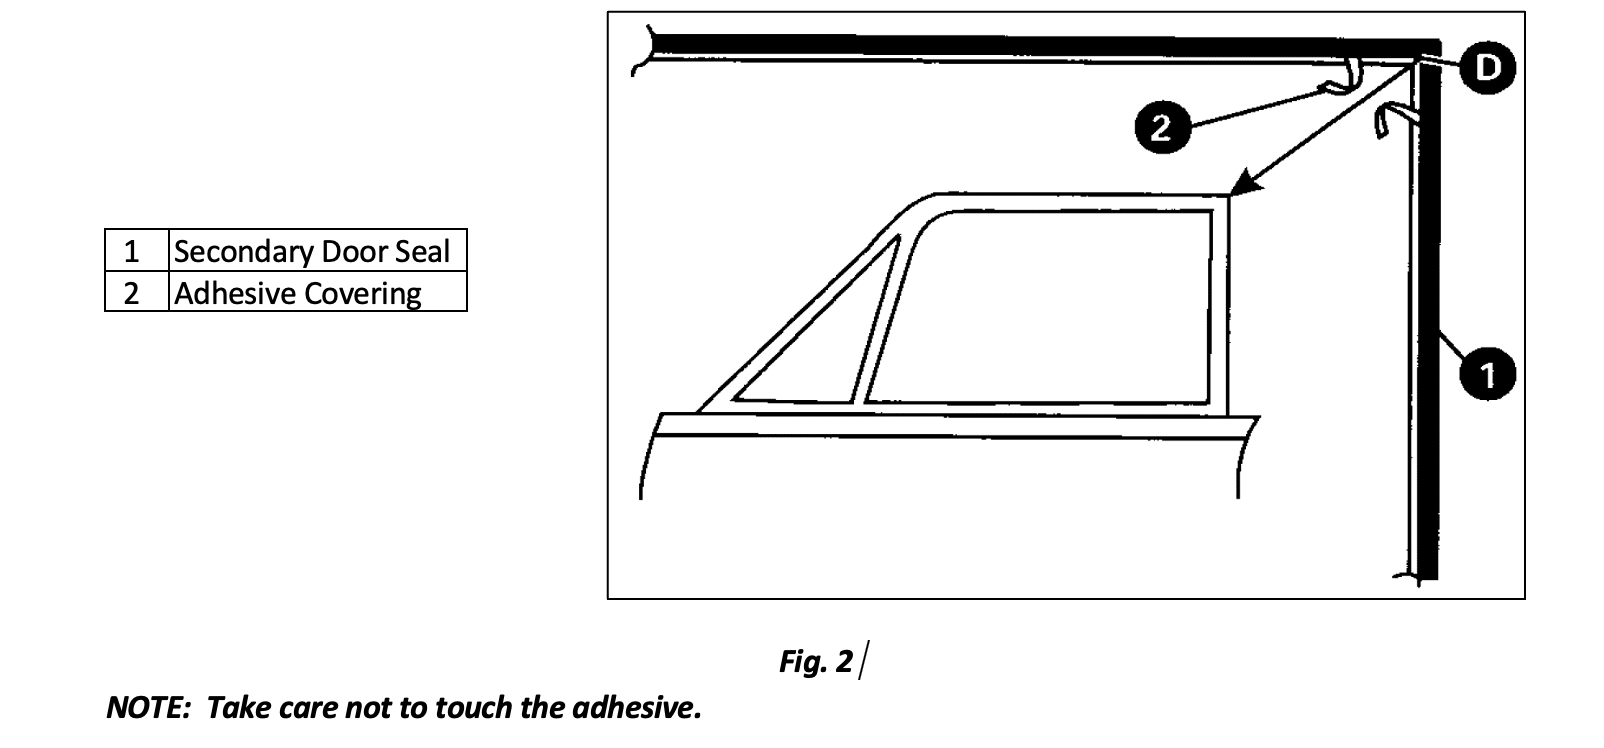
9) Pull away approximately 5 cm of the self-adhesive covering strips, working from the secondary door seal mitred joint along both sections of the seal (as shown in Fig. 2 below).
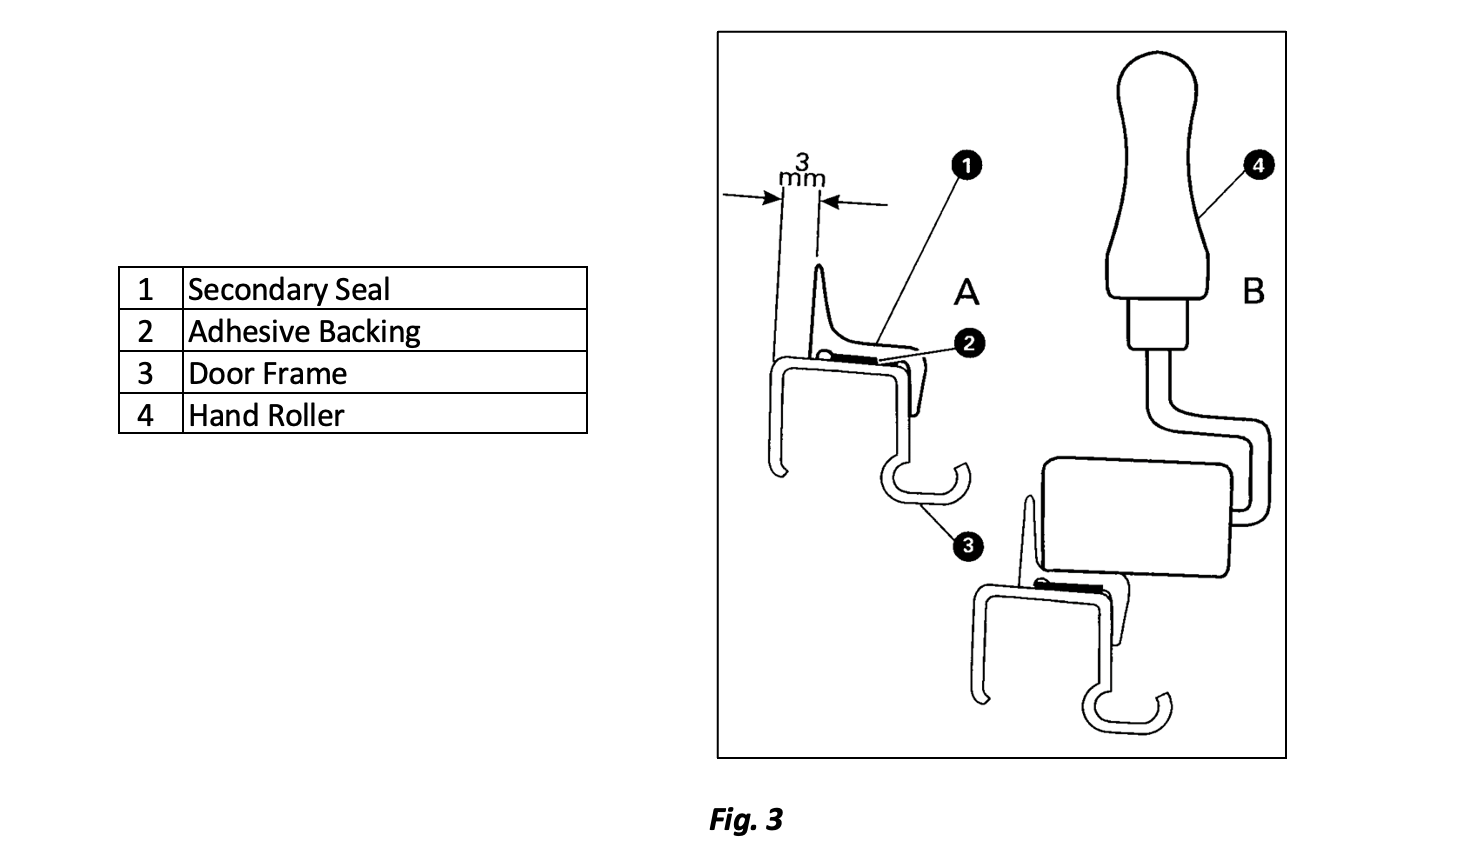
10) Locate the mitred joint and align point 'D' with the corner of the door frame ensuring that the inner lip of the seal locates on the inboard frame surface. The outer seal face should be approximately 3 mm inboard of the outer frame surface (as shown in Fig 3 below).
11) Proceed to stick the remainder of the seal to the frame to within 5 cm of where the seal will need to be cut, taking care to keep the seal lip straight without imparting tension to the seal section.
12) Using sharp scissors, trim the ends of the seal to match the frame angle or the junction between the frame and body paintwork.
13) Stick the ends of the secondary door seal to the frame.
14) Apply a hand-held roller (B) to the outer surface (as shown in Fig. 3) to enhance the adhesive bond, starting from the mitred corner.
15) Refit the primary door seal in its retaining channel ensuring that it has adequate swing clearance within the door aperture. If necessary, replace primary door seals with Prestige Parts seals.
16) It is advisable to dust the seal with talc and leave the doors closed for 24-48 hours to allow the seals to settle.