Fitting Instructions - Electric Window Motor UD11391NF (Early Square Type Motor Replacement)
Fitting Instructions - Part Number UD11391NF Electric Window Motor
The Prestige Parts® kit ref. UD11391NF replaces the original square (or rectangular) with a more modern round “constant-energy” type motor, without the necessity to perform difficult and expensive modifications to the switching arrangements.
The original motor utilised a single rocker switch to activate the window up and down, whereas constant energy motors are generally operated by a pair of microswitches. Included in this kit is a wiring loom and two relays, which can be connected directly to the original wiring in the door, and which enables this motor to be operated with the original switch.
Included in this kit are the following components:
• 1 x Round Window Motor UD71195 with fixing adaptor plate
• 1 x Nylon Drive Adaptor RH9610 (motor to chain drive mechanism)
• 1 x Wiring Loom UD11391LM
• 2 x Relays UD26632
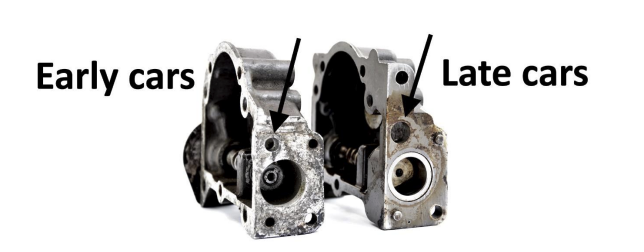
Please note: on cars prior to chassis number 08697, it may be necessary to enlarge the hole in the gearbox to allow the fixing screw to engage with the threaded hole in the round motor:
Before you start:
General information on the Electric Window Motors in the Silver Shadow and T1 is available under section M13 of Workshop Manual TSD2476, available by visiting http://rrtechnical.info/sy/tsd2476/13.pdf.
1) Disconnect the glass from the chain mechanism and make sure that it is running freely in the door frame. Excessive resistance will cause premature failure of the motor.
2) Make sure the chain mechanism is well oiled and moving freely.
3) Check the integrity of the nylon/metal lower drive gear. These can separate, causing the nylon gear to work independently of the metal gear, preventing the mechanism from operating.
4) Examine the inside of the door shell and old motor for evidence of water ingress. If there is evidence that water has been penetrating the door shell, replace all the necessary seals and check the door seals using a hosepipe. Replacement seals are available here at IntroCar www.introcar.com.
5) Check for voltage drop at the main window motor supply lead. This is common as wiring breaks down, particularly in the rear and passenger doors where the main supply wires are especially long. To operate efficiently, you need a minimum of 8V. Fitting the replacement window motor:
6) Unscrew the setscrews securing the motor to the aluminium drive casing and remove the old motor.
7) Remove and replace the nylon drive coupling with coupling RH9610.
8) Fit the new motor using the teardrop adaptor plate provided.
9) Fit the relays to the wiring loom.
10) Connect the wiring loom to the car and to the motor. The colours on the new loom have been matched to the original wiring on the car. The single end connectors on the wiring loom provided should be connected via the original connector block in the door to the wires of the same colour (e.g. green-green, yellow-yellow, red-red & black-black).
11) Disconnect the original relay inside the door. It is no longer required.
12) Secure the relay blocks so that they do not interfere with other components in the door.
13) Connect the remaining wires to the window motor.
14) Check window operation from the driver’s door, and from passenger door if replacing the front or rear passenger window motors, to ensure the window operates correctly from all switches.
If you have any questions, please do not hesitate to contact the vendor.