Fitting Instructions - Sill Moulding PS116113PA
Fitting Instructions - Bentley Azure / Brooklands Coupe Sill Moulding PS116113PA-X
The enclosed is not an OEM version of the Bentley Azure/Brooklands coupe Sill Moulding. Bentley Motors in Crewe have ceased to supply this moulding and this means that the aftermarket has no supplier of the genuine Bentley item. The enclosed sill moulding has been developed for the Prestige Parts range using existing tooling from a moulding which has a closely similar cross section to the original Bentley product.
Fitting Method
The Bentley product was fitted to the car by T bolts at each end, three plastic clips and double-sided tape. The method of attachment of the moulding in this package is slightly different. It is more easily accomplished if you have a second person to assist.
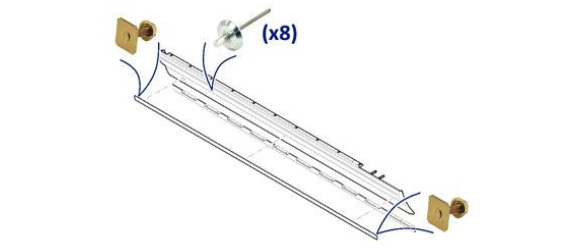
Enclosed with the moulding you will find 2 x T-Bolts (SPM2391-X), which come equipped with washers and nuts, and 8 x Pop Rivet Buttons (GHF1437).
1. There are two original holes at each end of the sill for T-bolts used to secure the original sill trim and plastic sill cover to the body. These holes will be reused to secure the new sill moulding and the plastic sill cover with the T-bolts supplied.
2. Between these points the new sill trims will be secured with 8 pop rivet buttons. To position these, put a strip of 2” masking tape down the length of the sill in the area that the trim will be fitted. From the centre of the hole at the rear of the sill that the T stud fitsthrough, measure forwards every (245mm) and mark the tape with a pen. Repeat this 8 times. Important: Take care that the marks are in the centre (vertically) of the recess. Handy hint: cut a piece of metal, plastic or stiff card 20mm x 40mm and make a small hole in the centre. This can be placed into the recess to mark the centre position for the 8 holes.
3. Where you have marked up the sill, drill the 8 holes with clearance for the 1/8” pop rivet holes in the plastic sill cover. Take care not to drill too deeply or you may mark the painted metal part of the sill behind.
4. Remove the masking tape and use a pop rivet gun to attach 8 x GHF1437 in each of the 1/8” holes, leaving the end holes clear for the new T-Bolts. After fitting, the pop rivet buttons will leave a 19/32” diameter “button” on the plastic sill cover.
5. Handy hint: at this point it helps to put a gentle “bow” in the sill moulding. To do so, place two 2 x 2” (or similar) blocks of wood approximately 85” apart on a flat surface. Place the sill moulding face side up on the two blocks and gently press down in the middle. This will leave the moulding with a slight curve, obtaining improved tension against the pop rivet buttons once the T-bolts at each end have been tightened.
6. Insert the T-Bolts supplied at each end of the sill moulding.
7. Two persons are required at this stage, with one to support the front of the moulding, while the other aligns the rear T-Bolt with the hole in the rear of the sill.
8. Insert the rear T-bolt in the hole at the rear of the sill and loosely tighten the nut and washer.
9. From the rear moving forward, lay the sill moulding against the “buttons” on the body. By gently pressing on the moulding with the heel of your hand or thumb, the moulding will snap over the buttons and be retained in place.
10. Line up the front T-Bolt with the hole in the front of the sill and loosely fit the washer & nut.
11. Adjust the sill trim by pushing it for forwards or backwards (sliding it on the T-bolts & pop rivet buttons) to make an equal space at the front & rear of the sill moulding trim to the plastic sill cover. Tighten carefully, so that the sill moulding is tight (but don’t over tighten as this may crush and distort the plastic sill cover and/or sill moulding).