Fitting Instructions - Prestige Parts Suspension Bush Kits
Fitting Instructions – Prestige Parts® Suspension Bush Kits 3Y0407200APL-X, PD30984PAPL-X & PD30985PAPL-X
These instructions are to be used when fitting the Prestige Parts polyurethane suspension bush kits to the front upper and lower suspension bushes to Rolls-Royce Silver Seraph, Park-Ward, Bentley Arnage Green Label, Red Label, Le Mans & Birkin models built from 1997-2002, chassis numbers 01001-08394.
There are a number of advantages to using the Polyurethane Bush Kits:
- No specialist tooling required to fit the bush, unlike the original rubber parts, which must be pressed in using special fixtures.
- Fitting time is reduced significantly.
- The Polyurethane bush is impervious to oil and other compounds harmful to rubber.
- The lifetime of the Polyurethane bush is significantly longer, due to the material being harder wearing and not bonded to the sleeve. Rubber compounds also deteriorate over time as chemical constituents leach into the atmosphere.
There are a couple of common questions regarding Polyurethane bushes:
- Will it make my suspension firmer and cause noise?
No - the hardness of the Polyurethane bushing has been carefully matched to provide the same response to damping forces as the original rubber bush. The Polyurethane material exhibits closely similar properties of
absorption to the rubber bushes. - Will it creak?
Again – no. Creaking is caused by “stiction”, where there is friction between components moving in opposing directions. This is resolved using the lubricant included in the kit in the manner recommended and by the inclusion, in some cases, of a slipper washer. - Will the bushes need re-lubricating?
No, the lubricant “cures” leaving a semi-solid layer of lubrication between the two surfaces. - Can I fit just one bush, or must all bushes be replaced at once with the Polyurethane type?
We recommend that you replace both bushes in each arm at the minimum. However, if one bush is worn, it is likely that others are close to the end of their serviceable life and you should consider replacing all of them. A bundle is available enabling you to purchase a full set at a significant discount. Click here to see the full suspension overhaul package (Prestige Parts ref. ARSUSKIT1-X).
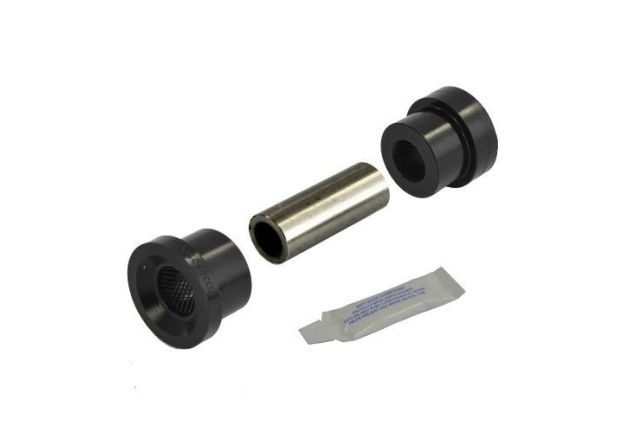
PD30985PAPL Front Lower Arm Leading Bush Kit
How do they work?
In the original bushes there are two tubes or sleeves, separated by a rubber compound that is bonded to both tubes. As the suspension operates, the inner tube and outer tube twist in opposing directions, and inner tube shifts laterally against the outer tube. Eventually repeated stress causes the molecules in the elastomers to break down, characteristically demonstrated by the rubber splitting away – usually from the inner tube, or occasionally in the rubber itself. This allows the suspension arm to move more freely, causing problems with handling, tyre wear, noise and – eventually – safety.
In the Polyurethane bush the bushing remains almost static within the arm, and the inner tube rotates freely within the bush via the lubricant. The bush absorbs radial and axial forces, but there is no bonding to break down or degrade.
Replacing the Front Lower Suspension Arm Bushes (PD30984PAPL-X & PD30985PAPL-X)
The following is in addition and subsidiary to the information provided in the workshop manual. Original workshop manual instructions should be followed to ensure suspension and geometry settings are correct.
1. Check and adjust the suspension geometry according to the original workshop procedures.
2. Mark the position of the eccentric cam nuts, using the lines provided on the external face of the nut.
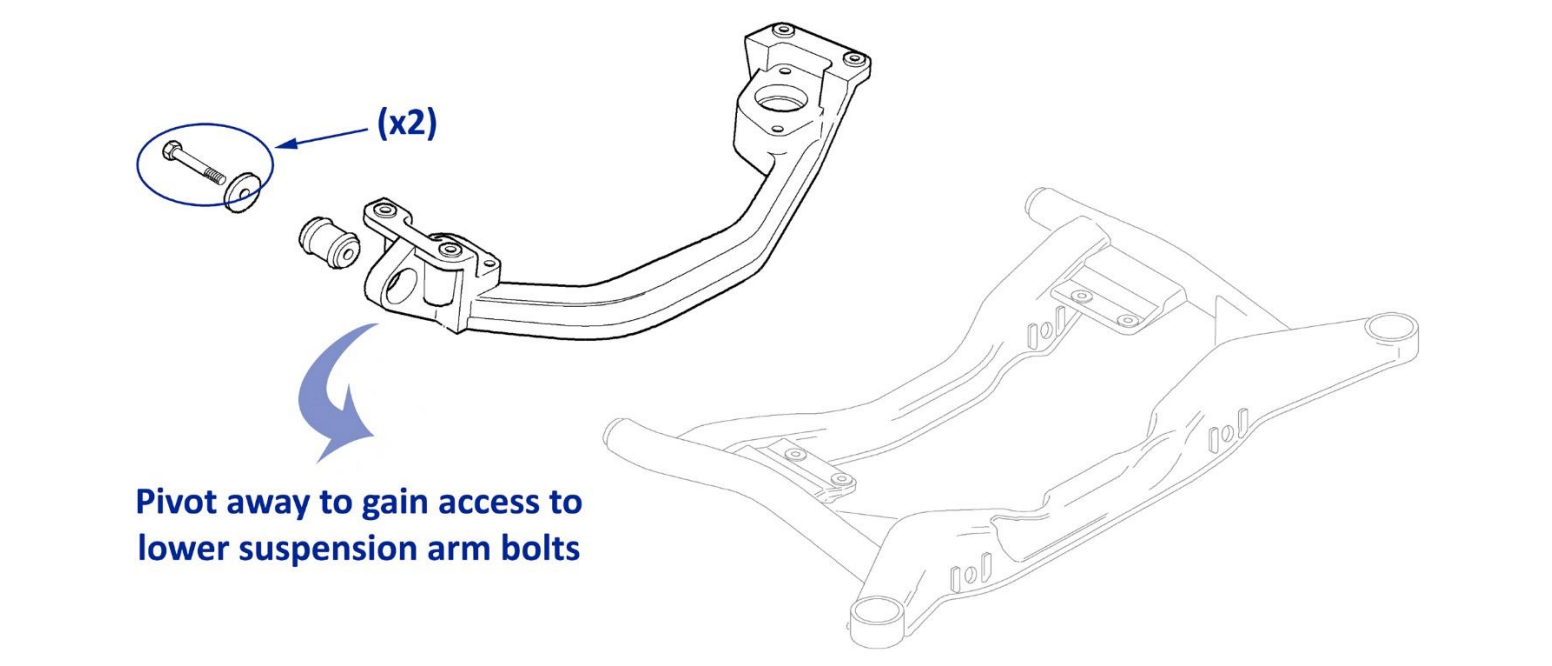
3. If necessary to gain access to the suspension arm bolts, remove the front subframe bolts and pivot the subframe away
4. Remove the nuts and bolts necessary to enable the lower arm to be removed. Keep note of the position of the leading and trailing spacers and eccentric nuts so they may be replaced in the same location.
5. The old bush may be pressed out or cut with a fine hacksaw to aid removal. Take care not to damage the arm.
6. Ensure the aperture is clean and free from debris.
7. Check the condition of the nuts, bolts and spacers. Replace if damaged or unserviceable. If serviceable, retain for re-use.
8. Using the lubricant provided, apply lubricant to the inside of the arm.
9. Apply lubricant to each contact face on both halves of each bush, and to the inside of the bushes.
10. Using a rubber mallet, tap each part of the bush into the arm, taking car to note which part is fitted to the leading and trailing parts of the arm, as per the diagram below (bushes are labelled on each flange):
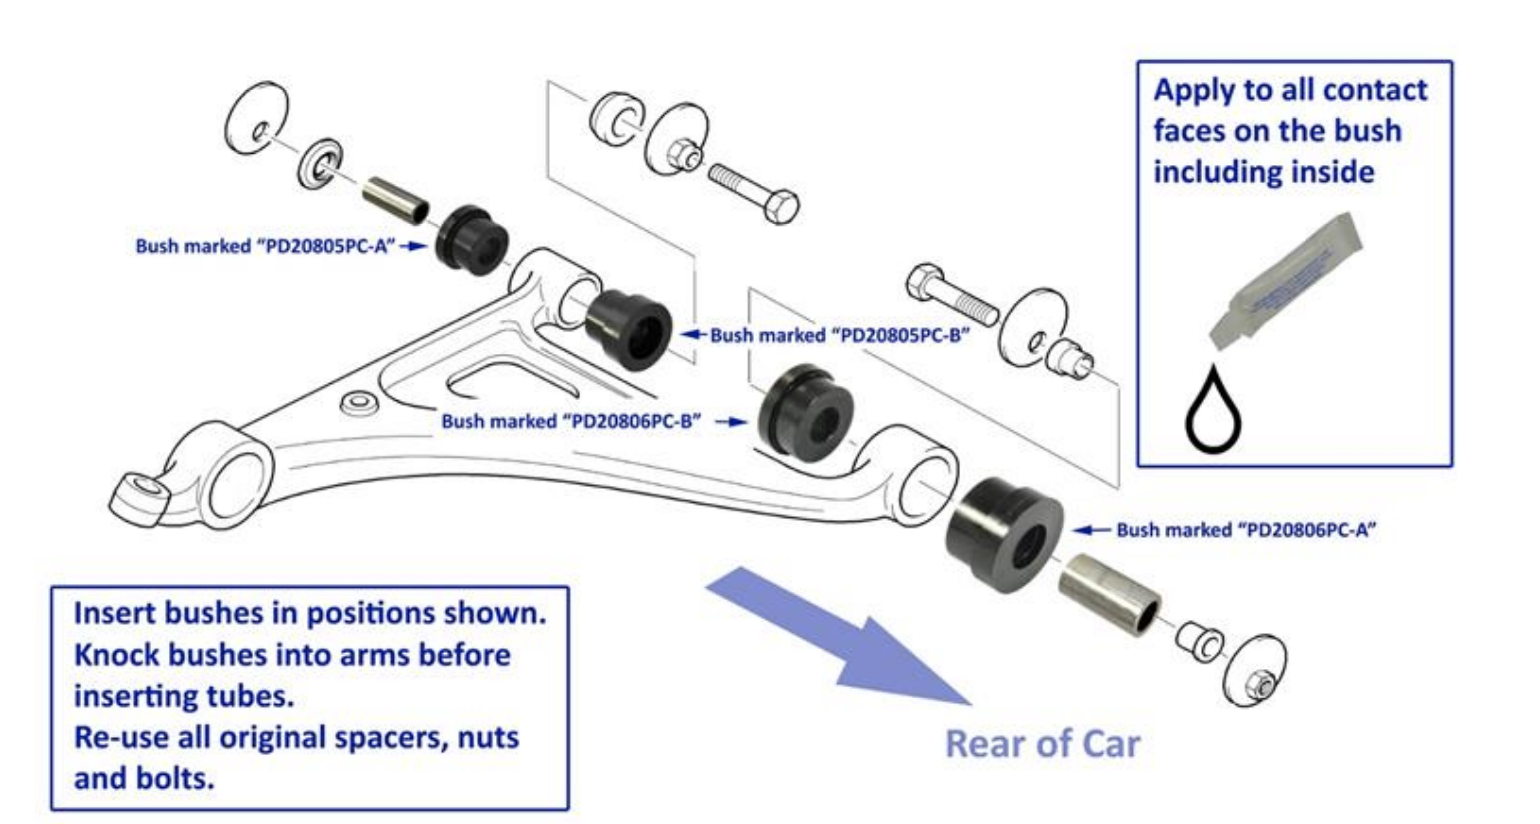
11. Press the tube through the centre of the bushes.
12. Insert the front and rear spacers in the same position as they were removed. They will mate with the bushes you have fitted.
13. Slide the arm back into position, fit the eccentric cam nuts, using the markings you made to assist alignment.
14. Torque tighten the Lower Arm to Subframe nuts to 265 Nm/17 kg m/195 lb ft.
15. Torque tighten the Lower Arm to Damper Ball Joint to 140 Nm/14.3 kg m/103.6 lb ft
16. Torque tighten the Lower Ball Joint nut to 100 Nm/10.2 kg m/74 lb ft.
17. Take the car for a drive to allow the suspension to “settle”. Re-check alignment and adjust as necessary.
Replacing the Front Upper Suspension Arm Bushes (3Y0407200APL-X)
The following is in addition and subsidiary to the information provided in the workshop manual. Original workshop manual instructions should be followed to ensure suspension and geometry settings are correct.
1. Check and adjust the suspension geometry according to the original workshop procedures.
2. Remove the nuts and bolts necessary to enable the arm to be removed. Keep note of the leading and trailing spacers and eccentric nuts and replace in the same position.
3. The old bush may be pressed out or cut with a fine saw to aid removal.
4. Ensure the aperture is clean and free from debris.
5. Check the condition of the nuts, bolts and spacers. Replace if damaged or unserviceable. If serviceable, retain for re-use.
6. Using the lubricant provided, apply lubricant to the inside of the arm.
7. Apply lubricant to each contact face on the bush, the inside of the bushes and to both faces of the slipper washer.
8. Using a rubber mallet, tap the bush into the arm as per the diagram below:
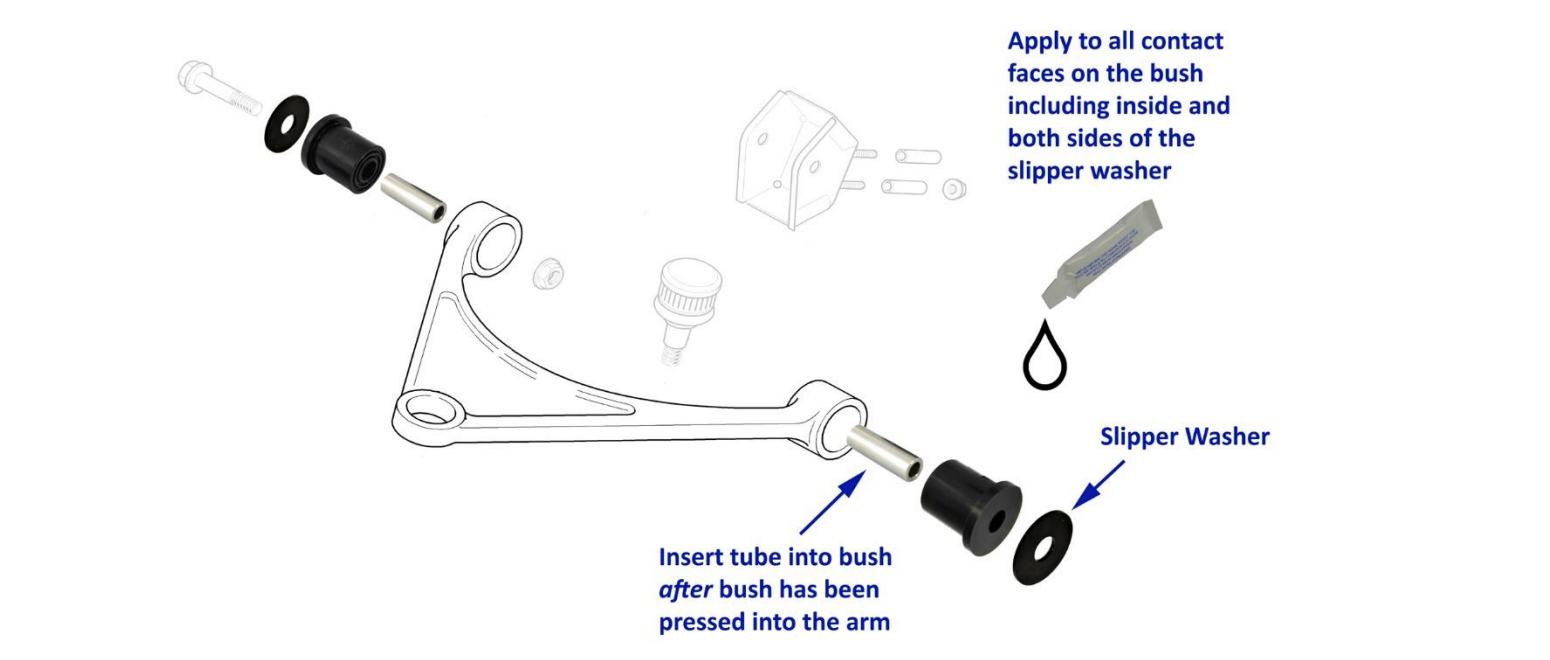
9. Press the tube through the centre of the bushes.
10. Slide the arm back into position, loosely tightening the nuts.
11. Torque tighten the Upper Arm to Bracket bolts to 115 Nm/11.7 kg m/85 lb ft.
12. Torque tighten the Upper Ball Joint nut to 80 Nm/8.1 kg m/59 lb ft.
13. Take the car for a drive to allow the suspension to “settle”. Re-check alignment and adjust as necessary.