Fitting Instructions - Spin-On Filter Adaptor Kit RH10003KIT
Fitting Instructions - Spin-On Filter Adaptor Kit RH10003KIT
This Oil Filter Adaptor Kit, part number RH10003KIT-X, is specifically designed for converting Rolls-Royce V8 engines to accept a Bentley Standard Screw-On Oil Filter, part number UE40893/07V121717A.
Suitable for:
Rolls-Royce: Silver Cloud II-III, Silver Shadow & Corniche (1965-76, chassis number 01001-26700)
Bentley: S2/3 & T1.
Please read all instructions below before fitting this Oil Filter adaptor.
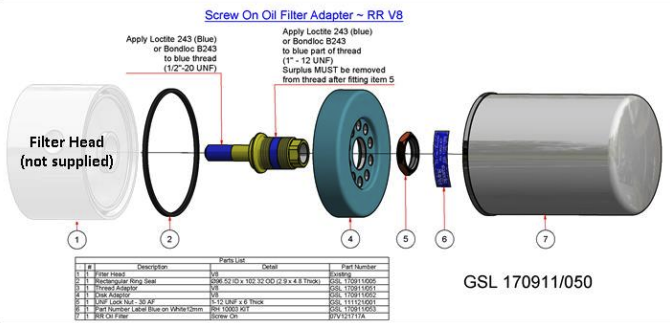
The Kit contains:
- Rectangular Ring Seal (UE 30652)
- Thread Adaptor (GSL 170911/051)
- Disc Adaptor (GSL 170911/052)
- UNF Lock Nut (GSL 111121/001)
- Oil Filter (UE40893/ 07V121717A)
Note – High Oil flow
This filter system has been designed for filters with a 1”-12 UNF thread in order to maximise the oil flow without restriction to the lubrication system.
This system should not be compared with systems, which use spin on filters with smaller threads. These smaller thread filters will restrict some of the oil flow and will have an adverse effect in the long term of excessive wear and contamination within the engine.
Preparation
(1) Ensure that the area around the original Oil Filter Housing is clean.
(2) Drain the engine oil.
(3) Remove the original Filter Can, Filter and Rectangular Seal.
Clean Installation Area
(4) Before fitting the new Assembly, clean the installation area and ensure that the 1/2”–20 UNF thread in the Filter Head is clean and not damaged. Install the Thread Adaptor (Item 3)
(5) Apply Loctite 243 or Bondloc B243 thread locker to the small thread of the Thread Adaptor, as indicated in the picture above.
(6) Screw this adaptor, as far as possible, onto the original Filter Head (item 1) until the face of the large diameter of the Thread Adaptor seals on the opposing face on the Filter Head.
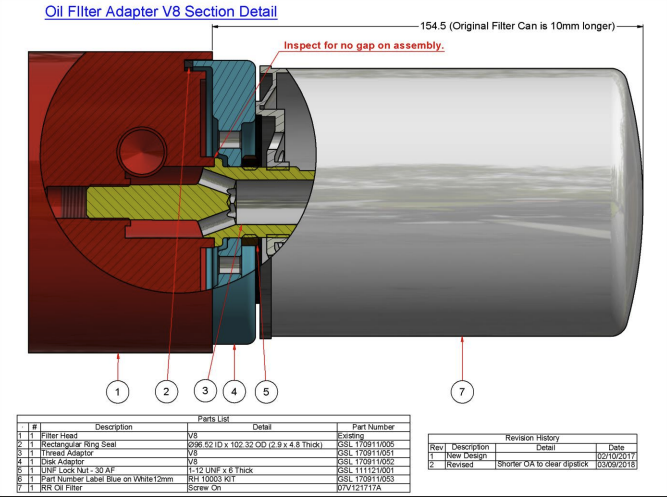
(7) Check that there is no gap between the Thread Adaptor and the Filter Head. These faces must make a full contact – see the picture of the ‘Oil Filter Adapter V8 Section Detail’ in the ‘Completed Assembly’ paragraph below.
(8) If this operation cannot be implemented by hand without the use of a spanner or socket, remove the Thread Adapter and rectify the damage to the 1/2”–20 UNF thread in the Filter Head. This thread must be in a good condition to accept the Torque load, as specified below. If this thread has excessive damage, do not fit this Adaptor Kit. The Filter Head must be replaced, or the thread repaired with suitable Helicoil Insert
(9) Install a calibrated Torque Spanner with a 21mm AF Socket Spanner onto the hexagon of the Thread Adapter.
Apply a maximum torque of 50Nm to the Thread Adapter. IF THIS TORQUE VALUE IS EXCEEDED, THE THREAD ADAPTOR AND / OR THE CRANKCASE HOUSING WILL BE DAMAGED BEYOND REPAIR.
Install a new Rectangular Ring Seal (Item 2)
(10) Fit a new Rectangular Seal (item 2) into position in the Filter Head, making sure that it is correctly seated. Do not use the old seal. Install the Disc Adaptor (Item 4)
(11) Place the Disc Adaptor onto the Thread Adaptor as shown in the picture below and engage completely into the related groove.
Install the UNF Lock Nut (Item 5)
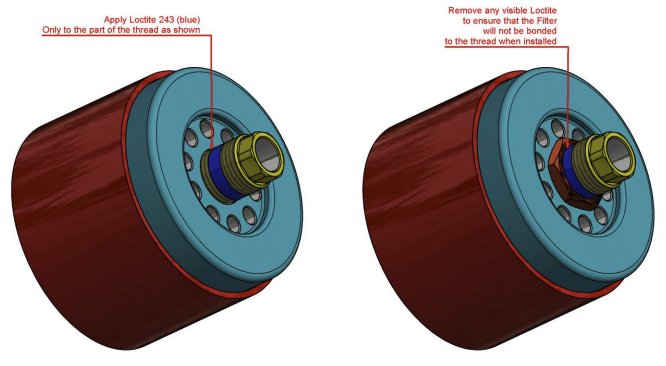
(12) Apply Loctite 243 or Bondloc B243 as indicated by the Blue area on the left hand of the picture above.
(13) Install the UNF Lock Nut onto the Thread Adaptor and lock in position while rotating the Disc Adaptor to ensure correct seating onto the Rectangular Ring Seal. Use a 30 AF Socket Spanner, which is deep enough to completely cover the hexagon of the 6mm thick UNF Lock Nut.
Apply a maximum torque of 45Nm to this Lock Nut. IF THIS TORQUE VALUE IS EXCEEDED, THE UNF LOCK NUT WILL BE DAMAGED BEYOND REPAIR.
Make sure that there is no Loctite or Bondloc visible on the Thread Adaptor or the outside of the UNF Lock Nut. This could bond the Filter to the new system. There must not be any Loctite or Bondloc on the portion of thread where the Oil Filter is installed.
Oil Filter (Item 7)
Shadow I engines only – it may be necessary to bend the dipstick tube 2mm to 3mm in towards the crankcase for ease of insertion of the Oil Filter onto the Thread Adapter. Do not bend more than necessary.
For all V8 engine models - Apply a thin film of engine oil onto the Oil Filter Sealing Ring.
Screw the Oil Filter (item 6) onto the Thread Adapter until the seal contacts the Disc Adapter. Turn the Filter by hand through a further half turn. Do not overtighten.
Check that the Oil Filter has more than 3.5 turns of engagement on the Thread Adapter
If less than 3.5 turns, there is an assembly error. Check the installation.
The Completed Assembly
After Installation
Fill the sump with the correct engine oil. Start the engine and check for leaks. On completion check the Oil Level.
Oil Filter Change
Change the engine oil and filter as specified in the manual or at least once per year.