Fitting Instructions - Replacement Heater Motor RD6924MTR
Fitting Instructions - Part Number RD6924MTR Replacement Heater Motor
The Prestige Parts® Heater Motor is a modern motor that may be used as a new replacement for the original motor, which is no longer available. The modern motor incorporates enclosed bearings, which makes it longer than the original motor. A number of small modifications to the mating parts on the car are necessary in order to affect a successful conversion.
Tools required:
• 3”/75 mm Socket or large metal tube
• 1”/25 mm solid metal bar
• Large soft-headed hammer/mallet or hydraulic press
• Small hacksaw
• Fine tooth metal file.
1) Remove the Heater assembly from the car, following the manufacturer’s instructions (see Appendix 1, pages 3-4).
Modifying the Heater Motor Base Mounting Plate:
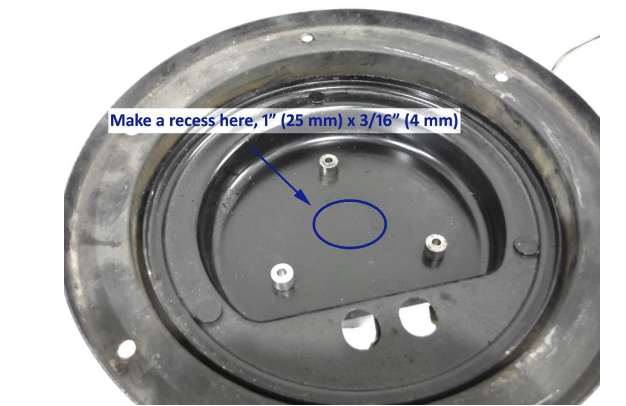
A slight recess in the centre of the base mounting plate is required to accommodate the bearing housing in the motor.
2) To create the recess, dismantle the mounting plate from the heater assembly.
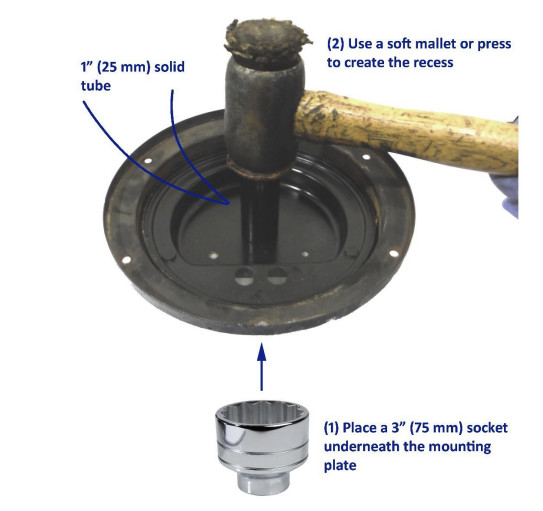
3) Position the base plate centrally on top of a 3”/75 mm diameter metal tube or large socket.
4) Place a 1”/25 mm solid bar on top of the mounting plate, making sure that it is again located centrally.
5) Using a press or a large hammer, use the solid bar to press a dish into the centre of the plate. The recess should be 3/16” or 4 mm deep.
6) Temporarily mount the motor on the three mounting spacers to ensure it is level and does not rock.
Modifying the Fan Mounting Tube
Because the new motor body is longer than the original, a modification to the mounting tube of the fan is necessary:
7) Using a small hacksaw, cut ¼”/ 6 mm from the end of the mounting tube, just above the retaining screw.
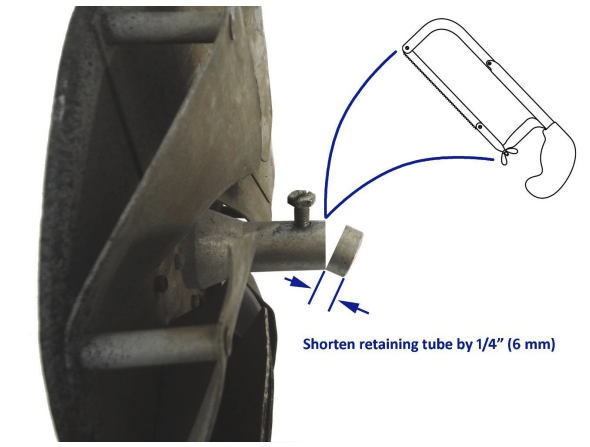
8) File the end of the tube to remove burrs and neaten the end.
Assembly
9) Assemble the new motor to the mounting plate and fan in the usual manner and reassemble the heater.
10) Please note: wiring colours are as per the original positive earth specification. If the car has been converted to negative earth, reverse the wiring and check the direction of the fan by connecting it to a battery or power supply.
11) Re-fit the heater assembly to the car following the original manufacturer’s instructions, checking that the fan does not foul. See Appendices (1) & (2) below.
Appendix (1): Removing the under seat heater
a) Drain the coolant from the heater system as follows by opening the tap on the heater return pipe. If a drain tap is not fitted, remove the hose at the forward end of the return pipe leading to the water pump.
b) Turn up the rear seat cushion, and then slide the front passenger seat backwards and of its runners to enable access to the heater.
c) Turn off the heater rheostat, and the master switch on the dashboard.
d) Disconnect the two wires on the underside of the heater. Label the positions on wires and heater motor to aid re-fitting.
e) Loosen the clips hoses and disconnect the two rubber hoses to the heater matrix.
f) Remove the six fixing screws and remove the complete heater from the car.
Appendix (2): Refitting the heater
g) Once the motor has been fitted, refit the motor reversing the operations in Appendix (1) above.
h) Replace the coolant/anti-freeze mixture.
Note: The above assumes that the car is still using the original positive earth system. In this case, the orange wire should be connected to the terminal marked SW on the heater, and the black wire to the terminal marked E. If the car has been converted to negative earth, you will need to switch these wires. If you are unsure, you may power the motor and check the fan is rotating correctly, pushing warm air into the cabin.
The heater circuit fuse is the sixth fuse from the left in the fuse box